Currently, there isn't a way to resize images once they're uploaded. Some images will be automatically resized to fit the dimensions of the content or paragraph type, blogs, personnel, icon rows, text + image, etc. The minimal image size for each content type feature image will be in the instructions for that content type, and eventually, displayed by the Featured Image button on the page in question. Should this functionality become available at a future date, it will be added to the system.
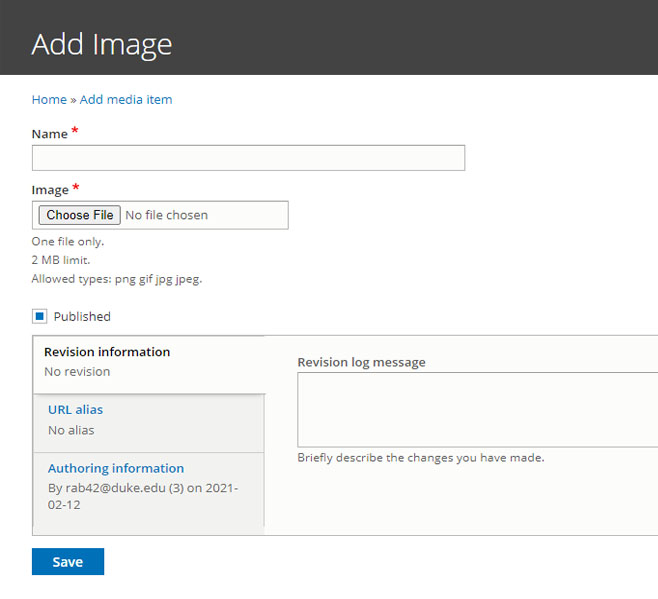
- Select Content > Media > Add Media
- Select Image
- Name - name the image something memorable to help searchability. It does not need to be the same name as the file name
- Select Choose File, find the file to upload from the computer
- Ensure the crosshairs on the preview of the image are over the most important part of the image. If the image is a portrait, ensure that the crosshairs are on the bridge of the nose to.
- Add Alt Text - a brief description of the image for adaptive readers. If the image is just a 'decoration' or not relevant to the content on the page, you can use " " as the alt text. i.e. a graphic separator, etc.
- Ensure the "publish" box is checked
- Save
- Repeat as necessary until finished.
Images cannot be resized once they are uploaded to the Media Library. Larger images can be inserted into various paragraph types, Icon rows, Sidebar Callouts, Feature images, etc., and the styling will adjust the image as necessary. However, images inserted into the Full Content (text) editor will need to be appropriately sized prior to uploading.
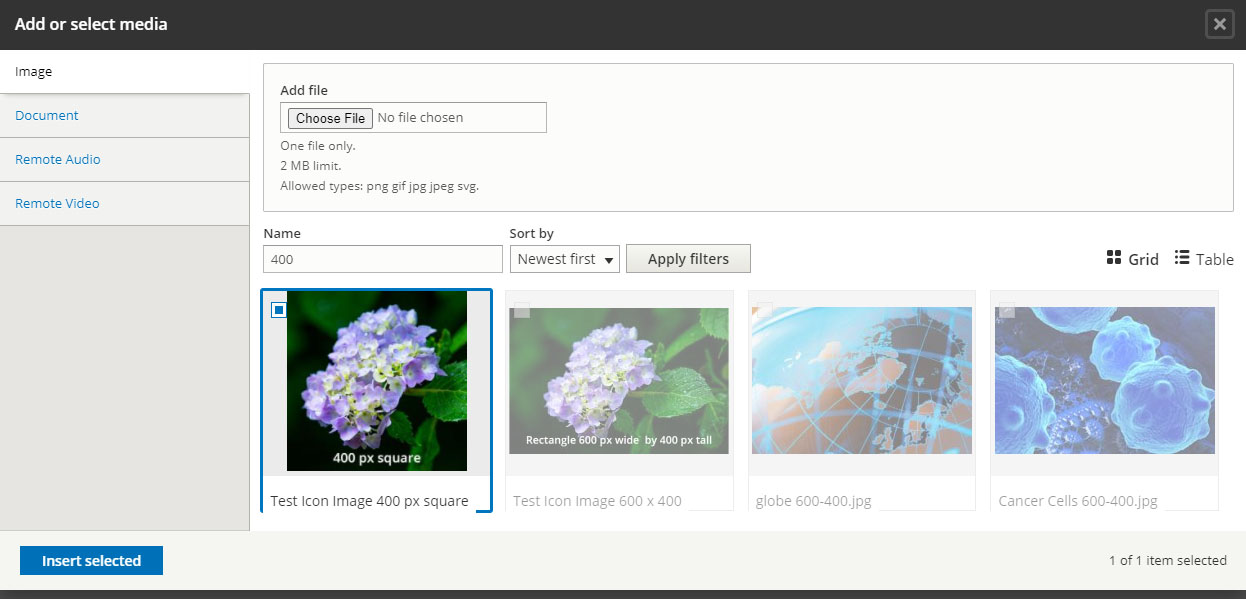
- Select the Insert Media icon from the WYSIWYG editor toolbar
- Select Image from the Add or Select Media Menu
- Search for the name of the image in Name box
- Select the checkbox in the top left corner of the desired image
- Select Insert Selected to return to the page
Format the image on the page
- Select the image
- Select desired options from the image formatting menu.
- Save
Image formatting menu consists of the following options:
- Caption: caption is added just below the bottom left corner of the image.
- Hyperlink: to make the image a hyperlink.
- Override the media image alt text: this includes marking the image as "decorative" which doesn't need "alt text".
- Align none: the image will be left aligned, but thte text will not wrap.
- Align left: image on the left and text wraps around the right side.
- Center: centers the image on the page.
- Align right: Image on the right and text wraps around the left side.
If an image is uploaded that is the wrong size or dimensions, replace the existing image in the media library instead of just uploading multiple new images. Replacing images will update the image wherever it appears on the site. Best practice is to only keep images in the Media Library that are in use.
- Login to the site
- Go to Content > Media> Media Library
- Find the image to be updated
- Select the pencil icon to edit the image
- Copy the alt text
- Select the Remove button
- Select Choose File and upload the new image
- Paste the alt text into the field
- Save.
Repeat as necessary until the image looks right.
Image Sizes
Feature Images
These are the recommended sizes, but other sizes will work. They'll either expand - (reduced resolution) or they may shrink to fit the area provided. The ratio of the featured image is provided by the "add media" button at the top of each page. Proportions are width x height.
| Type | Ratio | Size |
|---|---|---|
| Basic Page | Landscape 2.5:1 | 833 x 333px |
| Blog post | 600 x 400px | |
| Carousel | 1200 x 800px | |
| Division/Unit page | 1200 x 448px | |
| Lab | 5:2 | 1000 x 400 |
| Landing Page Image | 1600 x 640px | |
| Landing Page Video | 2.5:1 | 1440 x 500px |
| News | 16:9 | 1200 x 675px |
| Profile Portrait | 250 x 350px | |
| Text with image | 600 x 400px | |
| Timeline Milestone | 16:9 | 400px x 225px |
| Sidebar Callout | Landscape 3:2 | at least 300 x 200px |
| Story | 16:9 | 1200 x 675px |
Image widths in the body of the page
A standard page with a left side menu is around 833 px wide. Below are some sample sizes for images in column widths. The height of the image should be determined by the content of the page.