The WYSIWYG editor (What You See I What You Get) is the main way to enter text in the Body portion of a page and format that text using the icons on the toolbar. Some of the features are the same as found in a word processing software, some are specific to editing web pages. In general, to apply functionality, highlight the desired text and then select one of the icons from the toolbar. The icons and their functions, with examples where appropriate, are listed below.
Basic Text Formatting | Headings | Styles | Hyperlinks | Pull Quotes | Insert from Media Library | Insert Table

Spell Check
Misspelled words will display a red squiggly underline. CTRL >right click on a PC or CMD >right click on a Mac will display potential correct spellings options. Select the desired spelling.
Basic Formatting
Bold | Italic | Underline* | Strikethrough | Superscript1 | Subscript1
Align left | Align right | Align center | Justify | Insert horizontal line
Bulleted List | Numbered List | Insert Symbols
* The underline is not generally used on web pages since underlined content is typically a hyperlink. Avoid using it whenever possible.
Headings
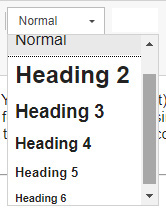
To ensure ADA compliance, headings should be used to organize content, and should be used in order.
Ex: Heading 2, heading 2, heading 3, heading 2, etc. Do not skip around (Heading 2, heading 5, heading 3)
Heading 2
Heading 3
Heading 4
Heading 5
Heading 6
Styles
Intro Style - typically for introductory text on a page. Centered and formatted.
Highlight a hyperlink and the style menu will offer the option to make it a button.
Create a Hyperlink
Left side chain link is to link to other pages on the website.
- Highlight the text that will become the hyperlink
- Select they hyperlink+ Icon
- Start typing the name of the page on the site to which the text should be linked.
- Select the appropriate page from the list provided
- Select Save
Link to documents on the site
Ensure that the document has been uploaded to the Media Library
Follow the directions for Add/Insert Document Link in Working with the Media Library
Right side chain link is to link to any URL
- Highlight the text that will become the hyperlink
- Select the hyperlink Icon
- Paste the URL in the URL box
- Select OK
- Select Save
Link to an email address
- Highlight the text that will become the hyperlink
- Select the hyperlink Icon
- From the Link Type menu select "E-mail"
- Paste the email address in the "E-mail Address" box
- Optional: prefill the subject and any additional desired content
- Select OK
- Save
Link to a particular spot on a page (anchor)
- Place the cursor at the beginning of the line to which the hyperlink will point
- Select the flag icon
- Name the anchor a short memorable name or acronym
- Select OK. A small red flag will appear, but will not be visible on the published page.
If the anchor is in the same paragraph (content box) as the hyperlink
- Highlight the text that will become the hyperlink
- Select the rightmost hyperlink Icon
- From the Link Type menu select "Link to Anchor in the Text"
- From the "By anchor name" menu, select the anchor to which the hyperlink should point.
- Select OK
- Save
If the anchor is in a different paragraph or you want to link to the anchor from a different page, etc., add #anchor to the end of the URL of the page where the anchor is.
Example: https://documentation.medschool.duke.edu/basic-editing-functions/formatting-text-using-wysiwyg-editor#anchor
Unlink hyperlinked item
- Select hyperlink
- Select the unlink hyperlink icon.
Pull Quotes
- Select the text to be highlighted
- Select the pull quote icon
- Save
Litora inceptos ultricies sit mauris sollicitudin massa consectetur sed, Habitasse tortor dictumst aenean elementum felis dapibus laoreet leo arcu ac inceptos, Diam placerat elementum praesent eros odio lacinia habitasse porta, nulla fusce est tempor porttitor sem.
-Italicised
Insert from Media Library
Images, audio and video can be inserted into the text box, as well as in separate paragraphs. NOTE: Be sure to use the icon with the music note. The other image icon will not format correctly.
Images must be uploaded and pre-sized. The editor is not yet able to size of images.
See Working with the Media Library
Format Tables
- Select Table Icon
- Select the number of rows and column desired
- Select Headers for rows, columns or both
- Add optional caption
- Select OK
- Add Data to the table
- Save
The Width of the table will expand with the length of the text until the table is the width of the page
| Column Header | Column Header |
|---|---|
| Row Header | Content |
| Row Header | Content |